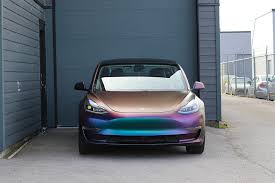
Chameleon Wraps have become a popular choice for vehicle enthusiasts and DIYers looking to give their cars a unique, color-shifting appearance. These wraps create a stunning visual effect that changes color depending on the angle and lighting. While the process of applying chameleon wraps may seem intimidating, with the right tools, preparation, and techniques, you can achieve a professional-looking finish. Here’s a step-by-step guide to help you apply chameleon wraps like a pro.
Step 1: Gather Your Tools and Materials
Before starting, make sure you have all the necessary tools and materials:
- A high-quality chameleon wrap film
- A heat gun or hair dryer
- A squeegee (preferably with a felt edge)
- A sharp utility knife
- Isopropyl alcohol and a microfiber cloth
- Gloves (to prevent fingerprints)
- Masking tape (optional)
Step 2: Prepare the Surface
A clean and smooth surface is essential for a flawless application. Wash your vehicle thoroughly to remove dirt, grease, and debris. After washing, wipe down the surface with isopropyl alcohol using a microfiber cloth to eliminate any remaining contaminants. Ensure the surface is completely dry before proceeding.
Step 3: Plan Your Application
Chameleon wraps are best applied in sections to ensure precision. Identify which areas of the car you’ll wrap first, such as the hood, roof, or doors. If needed, use masking tape to mark boundaries or align the wrap film.
Step 4: Cut and Position the Wrap
Cut a piece of chameleon wrap slightly larger than the area you’re covering. This gives you room to adjust and trim later. Carefully position the wrap over the surface, ensuring it aligns properly. Avoid stretching the film excessively at this stage.
Step 5: Apply the Wrap
Start from one edge and work your way across. Use a squeegee to press the wrap onto the surface, working in small sections. Apply firm but even pressure to remove air bubbles and wrinkles. For curved areas, use a heat gun to gently warm the film, making it more pliable and easier to conform to the shape.
Step 6: Trim Excess Material
Once the wrap is securely applied, use a utility knife to trim any excess material along the edges. Be cautious not to cut into the vehicle’s paint. For a clean finish, tuck the edges of the wrap neatly under trim pieces or panels.
Step 7: Final Touches
After trimming, go over the entire surface with a heat gun to activate the adhesive and ensure a strong bond. Smooth out any remaining imperfections with the squeegee. Inspect your work for air bubbles or loose edges and address them promptly.
Step 8: Maintain Your Wrap
To keep your chameleon wrap looking vibrant and durable, clean it regularly with a mild soap solution and avoid abrasive materials. Protect it from harsh chemicals and prolonged exposure to sunlight.(VViViD Vinyl Wrap)
By following these steps and taking your time, you can achieve a professional-grade finish with your chameleon wrap. Whether you’re customizing your car for personal style or preparing it for an event, this eye-catching application is sure to turn heads on the road!